So the shower in our master bathroom is a glass shower, and the scumminess of the doors has been bugging me since we moved in..And of course it has only gotten worse. So today I decided to look for a homemade cleaner to get rid of it, because the ones in the stores are so chemically and strong.
First one I came to was a winner because I had all of the ingredients...
Here is the one I used, from Fabulessly Frugal.
Vinegar, corn starch, and dish detergent.. I used Dawn as used here.
The corn starch is obviously the agent that holds the vinegar and soap to the wall to keep it doing its job longer.
Now, if you stand in the shower like I did, you will feel like you are in a pickle jar. :)
But 10 minutes later, I used a sponge and wiped it all down, then I sprayed it clean.
I wish I had taken before and after pics! WoW!
I tried a magic eraser a few weeks ago with no results..
This just cut through the grime!!! I need to do another application, as some spots were missed.
Anyway, had to share! Happy frugal cleaning!
Saturday, August 24, 2013

Tuesday, August 13, 2013
UPDATE: Homemade cleaners
So I have been using my homemade cleaners for about 4 months now, and thought that the info I posted about them could use an update.
Laundry Soap: So I never did try the liquid version of my laundry soap because frankly, that took way too much time. So I now create my powder version in about 5 minutes.
Laundry Soap: So I never did try the liquid version of my laundry soap because frankly, that took way too much time. So I now create my powder version in about 5 minutes.
- 1 bar of Ivory soap, grated fine (small holes on my hand grater- the whole bar)
- 1 cup Borax
- 1 cup Arm & Hammer washing soda
That is IT! I use a 1 1/2 tablespoon measure that we saved for some reason from Miracle-Gro. Most loads get one scoop. Some bigger loads or dirtier loads or stinkier loads get 2 scoops.
This recipe makes about 15 regular loads. I honestly have never taken the time to count how many.
Fabric Softener: Super super easy and so much cheaper than the regular brands. If you are addicted to the smell of Gain or Downy or whatever, well, this won't fill that void. (I have started adding a dryer sheet to big loads for more static cling fighting power.)
Recipe:
- 1 cup of hair conditioner (ANY kind... I now use V05 because it is 75 cents a bottle at Walmart.)
- 1 1/2 cups distilled white vinegar
- 3 cups water
I now don't even bother with a bowl and whisk. I pour all of this in my saved fabric softener bottle from my Downy days, put the cap on, and shake to mix. A bigger bottle will hold a double of this recipe.
I use a capful of the stuff for every load. Sometimes I add 10 drops of lavender oil to the mix also, for extra freshning power. (Running low and need to locate this in our new town!)
Dishwasher detergent:
- 1 TBL Borax
- 1 TBL Kosher salt
- 1 TBL Washing Soda
This is enough for one load. I usually put about 4 loads worth in a small container under my sink and swirl the contents to mix well.
About once a week I squeeze a lemon into the dishwasher (no seeds please!) to get the freshness of lemon in there as well.
And my rinse aid dispenser is always full of white vinegar.
Toilet Cleaner:
This is probably the most "fun" because of the bubbles that remind me of volcano experiments as a kid :)
Sprinkle baking soda in the bowl. Pour white vinegar on top to get the bubbly action going. I probably use about half a cup of baking soda and a cup of vinegar. Again, sometimes I sprinkle in some drops of lavender oil, but the vinegar smell goes away after a little bit.
Let sit for about 10-15 minutes.
If you need some more scouring power when scrubbing, sprinkle more baking soda in there.
I did go back to buying all purpose cleaner, as I felt like the vinegar and water wasn't cutting through the grime on my countertops. I love the smell of Method cleaners from Target (pink grapefruit is my fave right now.)
Shower Cleaner:
I tried the Method shower cleaner and low and behold, it is not doing as good of a job as my homemade stuff, which is mostly vinegar and water with a little Dawn dishsoap. (See my previous blog post for the link).
All this homemadeness has enlightened us to making our own foot scrubs and foot soaks and lots of other things. Next blog post will share some of those. Happy cleaning!
Thursday, July 11, 2013
Blanchard the builders
Can we fix it??? Yes WE CAN!!!!!
As the girls spent their week at the "G's" in Florida (G and Gdaddy- or Grammy and Granddaddy- or Rick and Betsy's) Todd and I had a few days of checking out restaurants, listening to music in NOLA, and watching "House of Cards" late nights here at the house.
So on Wednesday, it was decided that the rest of our "kidless" time would be spent repairing the back fence. Boards were loose and rotting, and it was a matter of time before Guinness truly used the state of things to his advantage and took a stroll out of the yard.
SO, Thursday the work began. The physical work anyway, as Todd sat with pen and paper for hours configuring what we needed, and we made a trip to Lowe's on Wednesday just to get an idea of the supplies there in conjunction with his list.
Thursday we headed to Lowe's and after at least two hours, left with a trailer full of wood, concrete mix, tools, etc. Thursday was all about post hole digging, which we soon found out only Todd could do in the unbelievably hard ground we had to dig in. Friday after the post hole digger broke and we headed back to Lowe's for some more wood, we installed some 2 x 4's and prepared for the long day Saturday.
Saturday was a 14 hour day.. breaks only for lunch and dinner and one beer break. :)
But around 10 o clock PM Saturday, we installed the last board.
Here are the before and after photos:
Here are some day by day photos to show the progress. What a job!
As the girls spent their week at the "G's" in Florida (G and Gdaddy- or Grammy and Granddaddy- or Rick and Betsy's) Todd and I had a few days of checking out restaurants, listening to music in NOLA, and watching "House of Cards" late nights here at the house.
So on Wednesday, it was decided that the rest of our "kidless" time would be spent repairing the back fence. Boards were loose and rotting, and it was a matter of time before Guinness truly used the state of things to his advantage and took a stroll out of the yard.
SO, Thursday the work began. The physical work anyway, as Todd sat with pen and paper for hours configuring what we needed, and we made a trip to Lowe's on Wednesday just to get an idea of the supplies there in conjunction with his list.
Thursday we headed to Lowe's and after at least two hours, left with a trailer full of wood, concrete mix, tools, etc. Thursday was all about post hole digging, which we soon found out only Todd could do in the unbelievably hard ground we had to dig in. Friday after the post hole digger broke and we headed back to Lowe's for some more wood, we installed some 2 x 4's and prepared for the long day Saturday.
Saturday was a 14 hour day.. breaks only for lunch and dinner and one beer break. :)
But around 10 o clock PM Saturday, we installed the last board.
Here are the before and after photos:
 |
| BEFORE The fence behind the retaining wall was surrounded by years worth of organic material and was rotting. |
 |
| BEFORE These wood slats had seen better days, the gate wouldn't even open when we first moved in (who doesn't take a trip to explore their own woods???) |
 |
| AFTER |
 |
| AFTER |
 |
| AFTER with awesome new big gate that can fit a canoe through it |
Here are some day by day photos to show the progress. What a job!
I will never look at a fence the same way!
 |
| Progress after Thursday (Day 1) |
 |
| Day 1 progress |
 |
| don't make em like they used to :) |
 |
| Day 2 |
 |
| Day 2 |
 |
| Beginning of Day 3 |
 |
| Day 3 at beer break o clock :) |
 |
| Wonder Blammit twins activate! |
 |
 |
| At least we had an awesome view the whole time :) |
Paddling Lake Chinchuba
One of the best parts about this house is the lake right behind it.
It's not a big lake, by any stretch. But it is open water that one can throw a kayak or canoe in a paddle.
Yes I will know every curve of the land in no time...
but the peacefulness of hearing only the paddle dipping in and out of the water and the boat moving through the lake is worth the possible monotony.
Here are a few pics from the only time I brought my camera kayaking.
I had to put it in a Ziplock bag stuffed into my shirt as the kayak is a "sit on top" kayak with nothing really to store anymore than your bottom! :)
It's not a big lake, by any stretch. But it is open water that one can throw a kayak or canoe in a paddle.
Yes I will know every curve of the land in no time...
but the peacefulness of hearing only the paddle dipping in and out of the water and the boat moving through the lake is worth the possible monotony.
Here are a few pics from the only time I brought my camera kayaking.
I had to put it in a Ziplock bag stuffed into my shirt as the kayak is a "sit on top" kayak with nothing really to store anymore than your bottom! :)
 |
 |
| Love sighting the egrets and herons that frequent the lake |
 |
| So I traversed a small dam to get into Bayou Chinchuba (more water to explore), paddled around a bend, and this was in my way... till next time, Bayou Chinchuba. I will figure a way around these trees. |
 |
| Dam It! |
 |
| I was not invited to this geese party. |
 |
| most random place to store one's rollerblades! |
 |
Happy 40th, Todd
6/22/2013
We celebrated here at the new homestead in Mandeville with friends and family, boiled shrimp, and lots of laughs.
I only took the camera out for the cake part... I am slacking these days with the pictures!
Here are the few shots that I have.


We celebrated here at the new homestead in Mandeville with friends and family, boiled shrimp, and lots of laughs.
I only took the camera out for the cake part... I am slacking these days with the pictures!
Here are the few shots that I have.


Saturday, June 29, 2013
The ultimate Blanchard casual dining table a.k.a. drinking the beer was definitely easier!
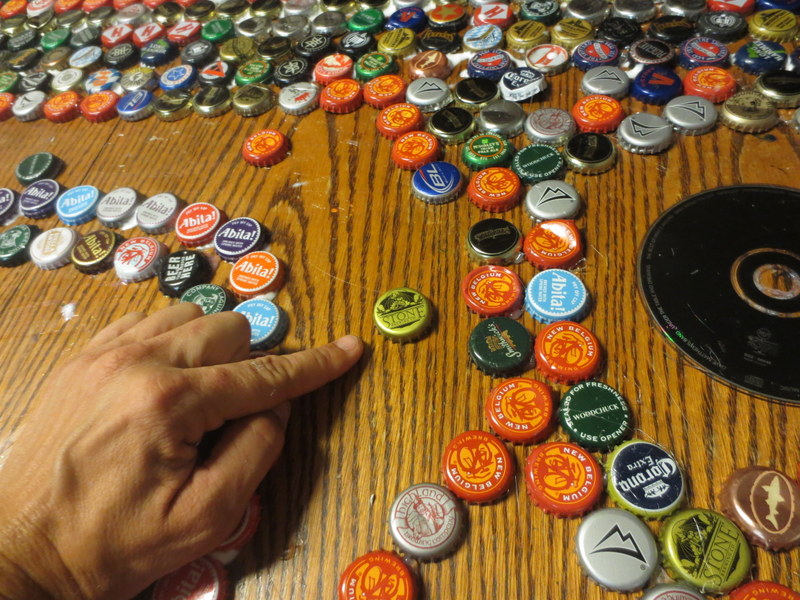
We have been collecting bottle caps for about 4 or 5 years now. We never fully knew what we were going to do with them, just that there was a plethora of ideas for bottle cap art.
The idea of refinishing our table with bottle caps was always an idea, but one we decided to wait to possibly complete when we moved to a house we would be in awhile.
SO yesterday, as we completed our stepping stone art project, I pulled out the collection of bottle caps to find a Guinness cap for Guinness' stepping stone. (the kit for which we have moved 5 times in the last 5 years)
I decided to "Carpe Diem" and finally start on the bottle cap art for our table. Which included at least an hour of sorting out the caps we had. I didn't count, but we definitely have a majority of New Belgium caps. My theory in this is that the various New Belgium brews were our solution to good available beers on a regular basis in the stores. Abita in Georgia was not always fresh, so we quit buying it up there. Highland Ales were our #1 cap when in North Carolina (not sure what happened to that collection of caps.. not all of them made the cut in the move to Georgia evidentally), but again, Highland beer was not even a faithfully fresh beer when purchasing where it could be found in Georgia.
So, New Belgium caps were followed in quantity by Sweetwater caps. (I think that Abita will surely win out in the next bottle cap creation as we can actually get fresh Abita bottled beer now!)
The next step, which took at least 2 hours, was to lay them out on our table to see 1. if we had enough caps to cover the table AND 2. what type of pattern we were going to create. (I will go into detail about the different rows/patterns and how they were chosen in the pictures of the assembly.)
Through input from husband, we decided to move the table into the garage to complete the project. (Inhalation warnings on the epoxy did the trick.) So I took the leaf out of the table (what CAN you do with those pieces of wood? This table had two of em!) and we moved the table into the garage.
And so began, Wednesday night at about 7 PM, the gluing of the caps.
I had purchased three containers of Gorilla Super Glue, with the hopes that would be enough.
After not even half of the first row of caps, I was almost out of Super Glue.
Time for another plan.
I decided that plain ol Elmer's glue would have to do the trick.
We had one bottle in our "art box", and Camryn had a 3/4 full bottle of Modge Podge.
When those were gone, I searched the whole house and found a pink sparkly bottle of Elmer's.
And yes, that was totally used as well and I had to resort to hot glue.
More than once in this project, I realized you must OVERESTIMATE the supplies you need!
Here are the pictures from Wednesday, June 26th... Day 1 of project:

Thursday, June 27th:
I took my time this morning with prepping the area for epoxy resin coating.
It also took almost three cups of coffee to wake me up. (I am a one cup of coffee person.)
I followed the recommendations fully with Painter's tape, duct tape, and foil.
So I read and reread the directions for the Epoxy. However, I wasn't quite prepared with the right size containers. I ended up sacrificing my 2 quart plastic pitcher, which I know will be easily replaceable at the Dollar Store. I also sacrificed a plastic spatula, a big plastic spoon, and a few 32 oz. drink cups.
Low and behold, 64 oz. of this stuff was not enough.. should have known. When I approximated the size, I wasn't thinking that the box is talking about a FLAT surface coating. Oh well.. live and learn.. off to Lowe's I go for more epoxy resin.
6/27/13 1:27 PM: I just finished the full first coat.
Here are a few things I would definitely do differently:
Last coat of the day was at 9:30 PM.
Todd opened the garage door as I was smoothing it out, to put the Jeep back in.
Here's what fell from the garage door onto the goopy table!

1:30 AM, Friday, June 28th.. LAST COAT APPLIED!
Now we wait for it to cure. 48-72 hours.
Friday, June 28
So at some point today around noon, I decided to remove the foil and duct tape and painter's tape.
Lo and behold, the sticky drips discussed above had, of course, seeped into the duct tape and foil, so now the edges of my table look like this:
SO, not what I had planned. The edges are sharp, too, so essentially, as Todd pointed out, the edges need to be smoothed anyway. I will get as much of this tape off as possible (I am slowly working it off of there, much to the demise of the skin on my hands!) and then we will sand and buff the edges.
I am going to finish this post, even though I REALLY wanted the last pictures to be of the table in the house. This project has taught me to expect the unexpected (as if life hasn't taught me that enough! :) and to think things through a little more than originally intended.
All in all, I am happy with the results of the table. Needs a little more work but it was a fun project!
ENDING WORDS: This table was like jumping into the deep end on the first day of swimming lessons. Maybe I SHOULD have started smaller... I don't think I 'drowned' in this leap, but it wasn't Olympic strokes! I figure once it's completely done, it has a lot of stories already built in to the creation, as well as the stories behind the bottle caps and design.


Here are the websites I used to plan the project out.
The idea of refinishing our table with bottle caps was always an idea, but one we decided to wait to possibly complete when we moved to a house we would be in awhile.
SO yesterday, as we completed our stepping stone art project, I pulled out the collection of bottle caps to find a Guinness cap for Guinness' stepping stone. (the kit for which we have moved 5 times in the last 5 years)
I decided to "Carpe Diem" and finally start on the bottle cap art for our table. Which included at least an hour of sorting out the caps we had. I didn't count, but we definitely have a majority of New Belgium caps. My theory in this is that the various New Belgium brews were our solution to good available beers on a regular basis in the stores. Abita in Georgia was not always fresh, so we quit buying it up there. Highland Ales were our #1 cap when in North Carolina (not sure what happened to that collection of caps.. not all of them made the cut in the move to Georgia evidentally), but again, Highland beer was not even a faithfully fresh beer when purchasing where it could be found in Georgia.
So, New Belgium caps were followed in quantity by Sweetwater caps. (I think that Abita will surely win out in the next bottle cap creation as we can actually get fresh Abita bottled beer now!)
The next step, which took at least 2 hours, was to lay them out on our table to see 1. if we had enough caps to cover the table AND 2. what type of pattern we were going to create. (I will go into detail about the different rows/patterns and how they were chosen in the pictures of the assembly.)
Through input from husband, we decided to move the table into the garage to complete the project. (Inhalation warnings on the epoxy did the trick.) So I took the leaf out of the table (what CAN you do with those pieces of wood? This table had two of em!) and we moved the table into the garage.
And so began, Wednesday night at about 7 PM, the gluing of the caps.
I had purchased three containers of Gorilla Super Glue, with the hopes that would be enough.
After not even half of the first row of caps, I was almost out of Super Glue.
Time for another plan.
I decided that plain ol Elmer's glue would have to do the trick.
We had one bottle in our "art box", and Camryn had a 3/4 full bottle of Modge Podge.
When those were gone, I searched the whole house and found a pink sparkly bottle of Elmer's.
And yes, that was totally used as well and I had to resort to hot glue.
More than once in this project, I realized you must OVERESTIMATE the supplies you need!
Here are the pictures from Wednesday, June 26th... Day 1 of project:
 |
| The naked table, ready for action. This table was purchase in May 2000. The top was basically stripped off due to my lack of knowledge at the time of the damage cleaners can do to wood tabletops. It was used for hundreds of art projects, and therefore went through many cleanings. |
 |
| Lauryn working on row 1. We used New Belgium for row 1. The white New Belgium caps were from their winter brews. We were a big fan of "2 Below" and "Snowed In". You will see in the finished product just how many red bottle caps we had! |
 |
| Rows 2 and 3. Row 2 was Sweetwater and Highland. Row 3 was mostly Sierra Nevada with some Lagunitas. We did 4 or 5 Sierra Nevade/Lagunitas with a Victory cap, Harpoon cap, and then "Beer From Around Here" which is Red Brick Brewing in ATL. |
 |
| Row 4 was a bunch of miscellaneous brews that I categorized as ones we really liked,. To name a few, there are Rogue, Stone, Oberon, Bell's, Terrapin.. and lots more. |
 |
| Almost done gluing. Well, the whole right side has a good many left that are loose. I added some CDs of top tunes in the Blanchard memory bank. |
 |
| This was probably 2 glasses of wine and 3 hours deep of gluing. |
 |
| Camryn graced me with her presence toward the end of the project again. She helped glue down some loose ends. |

 |
| The LAST cap that I glued down around 10:30 PM. |
I took my time this morning with prepping the area for epoxy resin coating.
It also took almost three cups of coffee to wake me up. (I am a one cup of coffee person.)
I followed the recommendations fully with Painter's tape, duct tape, and foil.
 |
| Ready to pour!!! |
Low and behold, 64 oz. of this stuff was not enough.. should have known. When I approximated the size, I wasn't thinking that the box is talking about a FLAT surface coating. Oh well.. live and learn.. off to Lowe's I go for more epoxy resin.
6/27/13 1:27 PM: I just finished the full first coat.
 |
| It seems that the resin is right up to the top of most of the bottle caps. I am thinking one more full coat in 4 hours will be enough to cover all. |
 |
| Here is part of my mess. |
Here are a few things I would definitely do differently:
- WEAR GLOVES! I am such a dufus on a regular basis when it comes to wearing gloves to do anything. Only if a container warns "Your skin will melt off if you do not use gloves." do I actually put them on. I have washed my hands more times than I can count in the last hours of messing with this stuff.
- THIS STUFF IS STTTIICCKKYY!!!!!!!!!! Oh man, I should have known but really, underestimated the stickiness of this stuff. My blue flip flops are ruined, and I had a coating of stickiness that took forever to get off on my hands and toes.
- DROP CLOTH! Should have put one down.. or something to catch drips. My foil barrier was not enough. Good thing my husband had the intuition to stop me and get me to move this table to the garage. Not sure if I can get the stuff off of the garage floor, but I figure once it is dried, it will just be clear little spots. UPDATE: Just scraped it up.. lord that took forever and was awfully sticky and a lot of muscle power needed.
- Did I say OVERESTIMATE how much you will need? I am headed to the local hardware store to buy more.
8:57 PM
Yes I am attempting to time yet ANOTHER coat... I don't even want to total how much I have spent on resin! :) Todd made a run to Lowes to get yet another gallon of it. Now I have to configure when I will do another pour and if I will stay awake to do the last one or wake up in 5-6 hours to do it. I say go to sleep and wake up and do it.
Last coat of the day was at 9:30 PM.
Todd opened the garage door as I was smoothing it out, to put the Jeep back in.
Here's what fell from the garage door onto the goopy table!

(not the actual gecko.. I was a little too freaked out and surprised to search for the camera!)
I shall not mention the filth flarn filth that exploded out of my lips!
So I managed to scoop him up with the gift card I was using for a spreader.
He scrambled away in the closed garage, so all I can imagine is that he is probably glued to the floor somewhere, in some state of demise... gecko fossil in the garage... that'll be interesting to find.
Now we wait for it to cure. 48-72 hours.
Friday, June 28
So at some point today around noon, I decided to remove the foil and duct tape and painter's tape.
Lo and behold, the sticky drips discussed above had, of course, seeped into the duct tape and foil, so now the edges of my table look like this:
 |
I am going to finish this post, even though I REALLY wanted the last pictures to be of the table in the house. This project has taught me to expect the unexpected (as if life hasn't taught me that enough! :) and to think things through a little more than originally intended.
All in all, I am happy with the results of the table. Needs a little more work but it was a fun project!
ENDING WORDS: This table was like jumping into the deep end on the first day of swimming lessons. Maybe I SHOULD have started smaller... I don't think I 'drowned' in this leap, but it wasn't Olympic strokes! I figure once it's completely done, it has a lot of stories already built in to the creation, as well as the stories behind the bottle caps and design.


Here are the websites I used to plan the project out.
- Instructables info
- College Candy's entry (which mirrors Instructables)
- Windfarm Blog entry on their experience with bottle cap table tops
- Info on pouring and sanding resin table top
Here are some that I have used SINCE to help with understanding epoxy resin and also, how to possibly sand and buff out the edges.
- Sanding and Buffing Resin
- Epoxy Chemistry
- Epoxy Cure Times: Scroll down to the cure times. This epoxy was a 1:1 mixture.
- Sanding Resin
Tuesday, June 25, 2013
Homemade Cleaning Product$$
In the last few months, in response to a documentary Todd and I watched, I decided to make my own laundry soap and fabric softener. I can attest that they work. Now, you don't get that "Gain freshness" or Snuggle scent that I know so many of you are addicted to, as I was. And I haven't figured out the cost-effectiveness of it exactly. But I know I haven't bought clothes soap or fabric softener since April, and that's with at least one to two loads of laundry everyday. Not to mention pool towels at our new house.
So here's my list of recipes and experiences with each:
So here's my list of recipes and experiences with each:
- Homemade Laundry Detergent/Liquid:
This is the recipe I used the very first time I made homemade laundry detergent. For some reason, however, I failed to see the "1/3 bar of Fels Naptha" and used the ENTIRE bar. Yes my mixture had a different consistency. It made a LOT.. like at least 2/3 of one of those enormous kitty litter containers. This resulted in at least 4 refills of a large Purex bottle. I did not have to remake this concoction until we set up our washer and dryer the second week of June.
It worked great.. clothes were clean, and the Fels-Naptha has a faint Ivory Soap smell.
Again, my concoction was a bit lumpy, obviously due to the extreme amount of Fels-Naptha.
For my second batch of laundry detergent, I sincerely didn't have the gumption to simmer a bar of soap on the stove and make the concoction and let it sit for 24 hours. So I decided to try the dry mixture. - Homemade Laundry Detergent/Powder:
SO here is the recipe I used to make a quick batch of laundry soap. Again, couldn't wait the 24 hours to let it thicken. This worked good.. I used about 1 1/2 TBLS per load (used a big green scooper that came with Miracle Gro that we had saved for some reason). Used a little more for bigger loads. - Homemade Fabric Softener:
This is my absolute favorite, as it floors me how simple ingredients can work the same as something I have spent as much money on as fabric softener. And it is so easy to remake when you run out! I use Suave conditioner... I have used the coconut scent and the ocean breeze scent. You can honestly barely smell the scent of the conditioner, so it really doesn't matter what scent you choose. I added some lavender oil that I had, and it added a bit of scent, but really not much. And it works well, for the most part. On occasion I pull something out of the dryer and I hear static cling.
Again, with all three of these, there is really not a strong scent to the laundry at all. The clothes just smell clean, which how do you define "clean smell". As Todd has said, that means "not stinky". :) He's super sensitive to smells, and no complaints from him so far. :)
Here are a few more things I have either made homemade or want to try: - Homemade floor cleaner:
So we have wood floors in our living room, and I bought some special stuff to clean those with. (I am kind of scared to try anything homemade on those yet.) So my living room had an awesome light almond scent, and the kitchen needed mopping. All that I had was lavender scented Lysol cleaner, which is super strong. So I decided to look up how to make my own. Again, I added some of that lavender oil to the mix, and it was just a very light scent of lavender and the floors were clean.
NOTE: Scroll down to where it says "mop and bucket". That's the recipe I used. I plan on making the homemade all-purpose cleaner once I get an empty spray bottle. - Homemade dishwasher detergent:
This is one I have not yet tried, but I am running low on dishwasher detergent so I will make it probably this afternoon. - Other homemade cleaning products:
This is a Pinterest board I found with lots of other ideas.
I am headed to the dishwasher after I hit "publish" on this post to fill the "Jet Dry" holder with vinegar!
I am telling you, I never imagined that I could use a huge bottle of vinegar for so much!
Also, Borax! I used Borax last week as a carpet stain remover... we need to just cover Camryn's room in plastic, with all of her art projects. I followed the directions on the Borax box and it worked like a dream! (Note: not ALL of the paint came up, but almost all did. Red Acrylic paint that had been there for at least a week.)
Enjoy and let me know how these work out for you!!!
Subscribe to:
Posts (Atom)